[Elastic Beanstalk] PHP 環境の nginx 設定ファイルを正しく配置する
![[Elastic Beanstalk] PHP 環境の nginx 設定ファイルを正しく配置する](/static/6bb468757ff4eaee38ccec4d9fa7b47c/9bec7/elastic-beanstalk-php-nginx-conf.png)
Elastic Beanstalk の PHP 環境で Laravel を動かそうと思ったところ、 nginx の設定ファイルの配置だけでハマりました。
同じように時間を浪費する方がでないようにメモ書き程度ですが、記事にしておきます。
結論
全部読んでいる時間のない方へ。
location ディレクティブの nginx conf ファイルは .platform/nginx/conf.d/elasticbeanstalk に配置すれば OK です。
ちなみに今回利用した Beankstalk のプラットフォームは 64bit Amazon Linux 2 v3.3.6 running PHP 7.4 です。
Elastic Beanstalk で Laravel を動かす
Elastic Beanstalk への Laravel アプリデプロイについては公式ドキュメントがあります。ズバリなタイトルですね。
しかし、この公式手順では一般的な Laravel アプリはどうやっても動きません。/public ディレクトリ直下に index.php 以外のページは存在しないため、すべて 404 になります。 Laravel ではパスを index.php にリダイレクトするのが必須なのです。
Elastic Beanstalk でリバースプロキシに Nginx を使っている場合、下記のような location ディレクティブが必要です。
これで URI に指定されたパスが見つからない場合は、 index.php にリライトされます。
location / {
    try_files $uri $uri/ /index.php?$query_string;
}
.platform/nginx/conf.d/ に conf ファイルを配置
さて、問題はこのファイルをどうやって Beanstalk で構築される EC2 に配置するか、ということです。
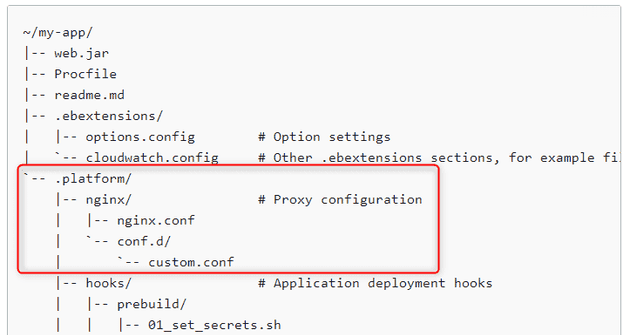
公式情報を見る限り .platform/nginx/conf.d/ へ配置すればよさそうに見えます。(※ Amazon Linux 2 から .platform ディレクトリに変更されたようです。)
この .platform フォルダはアーティファクトバンドル (Laravel のソースを zip ファイルで固めたもの) のルートに配置します。 Laravel の app や bootstrap ディレクトリと同階層です。
しかし .platform/nginx/conf.d/ に配置してアーティファクトをアップしてみても下記のようなエラーに見舞われます。
2021/10/18 00:03:38.750159 [ERROR] An error occurred during execution of command [app-deploy] - [start proxy with new configuration]. Stop running the command. Error: copy proxy conf from staging failed with error validate nginx configuration failed with error Command /bin/sh -c /usr/sbin/nginx -t -c /var/proxy/staging/nginx/nginx.conf failed with error exit status 1. Stderr:nginx: [emerg] "location" directive is not allowed here in /var/proxy/staging/nginx/conf.d/laravel.conf:11
nginx: configuration file /var/proxy/staging/nginx/nginx.conf test failed
抜粋すると、 "location" directive is not allowed here 、つまり location ディレクティブはここには書けまへんで、というわけです。
なんとなくこの設定ファイルの書き方の問題ではない香りがします。
ディレクトリによって読み込まれる箇所が違う
EC2 のインスタンスにログインして /var/proxy/staging/nginx/nginx.conf を見てみました。
$ cat /var/proxy/staging/nginx/nginx.conf
#Elastic Beanstalk Nginx Configuration File

user                    nginx;
error_log               /var/log/nginx/error.log warn;
pid                     /var/run/nginx.pid;
worker_processes        auto;
worker_rlimit_nofile    32633;

events {
    worker_connections  1024;
}

http {
    include       /etc/nginx/mime.types;
    default_type  application/octet-stream;

    log_format  main  '$remote_addr - $remote_user [$time_local] "$request" '
                      '$status $body_bytes_sent "$http_referer" '
                      '"$http_user_agent" "$http_x_forwarded_for"';

    include       conf.d/*.conf;
    map $http_upgrade $connection_upgrade {
        default     "upgrade";
    }

    server {
        listen        80 default_server;
        access_log    /var/log/nginx/access.log main;

        client_header_timeout 60;
        client_body_timeout   60;
        keepalive_timeout     60;
        gzip                  off;
        gzip_comp_level       4;
        gzip_types text/plain text/css application/json application/javascript application/x-javascript text/xml application/xml application/xml+rss text/javascript;

        # Include the Elastic Beanstalk generated locations
        include conf.d/elasticbeanstalk/*.conf;    }
}
なるほど、 .platform/nginx/conf.d 配下の *.conf ファイルは 22 行目と 40 行目で import されていることがわかります。 22 行目は http ディレクティブ内で 40 行目は server ディレクティブ内です。
location ディレクティブは server ディレクティブ内にしか書けませんので "location" directive is not allowed here というわけです。
つまり、正しくは下記のように設計されているわけですね。
.platform/nginx/conf.d/*.confは別のserver設定などを記述したい場合に配置.platform/nginx/conf.d/elasticbeanstalk/*.confはlocation設定や HTTP の設定を記述したいときに配置
要するに今回は .platform/nginx/conf.d/elasticbeanstalk に配置すれば OK ということになります。
もっとカスタムしたい場合は、 .platform/nginx/nginx.conf を配置すれば、 nginx.conf 自体を上書きできるはずです。
まとめ
ということで、もう少し本番環境向けの conf ファイルを配置して、無事 Laravel が動作しました。
location / {
    if ($http_x_forwarded_proto != https) {
        return 301 https://$host$request_uri;
    }
    try_files $uri $uri/ /index.php?$query_string;
    gzip_static on;
}
お疲れさまでした。


