[VMware-CentOS] 標準パーティションのディスクサイズを拡張する

![[VMware-CentOS] 標準パーティションのディスクサイズを拡張する](/static/46c29602d3c7119a104a7541cce8591b/8b7c9/extend-disk-size-of-standard-partition-in-centos-on-vmware-1.webp)
こんにちは。
今回は、標準パーティションで作成した CentOS7 の仮想マシンのディスクサイズを拡張する方法 を紹介します。
環境・事前確認
- 仮想基盤:VMware ESXi, 6.7.0, 15160138
- OS:CentOS 7.9.2009 ( ファイルシステムは xfs )
以下のようなパーティションを作成しました。
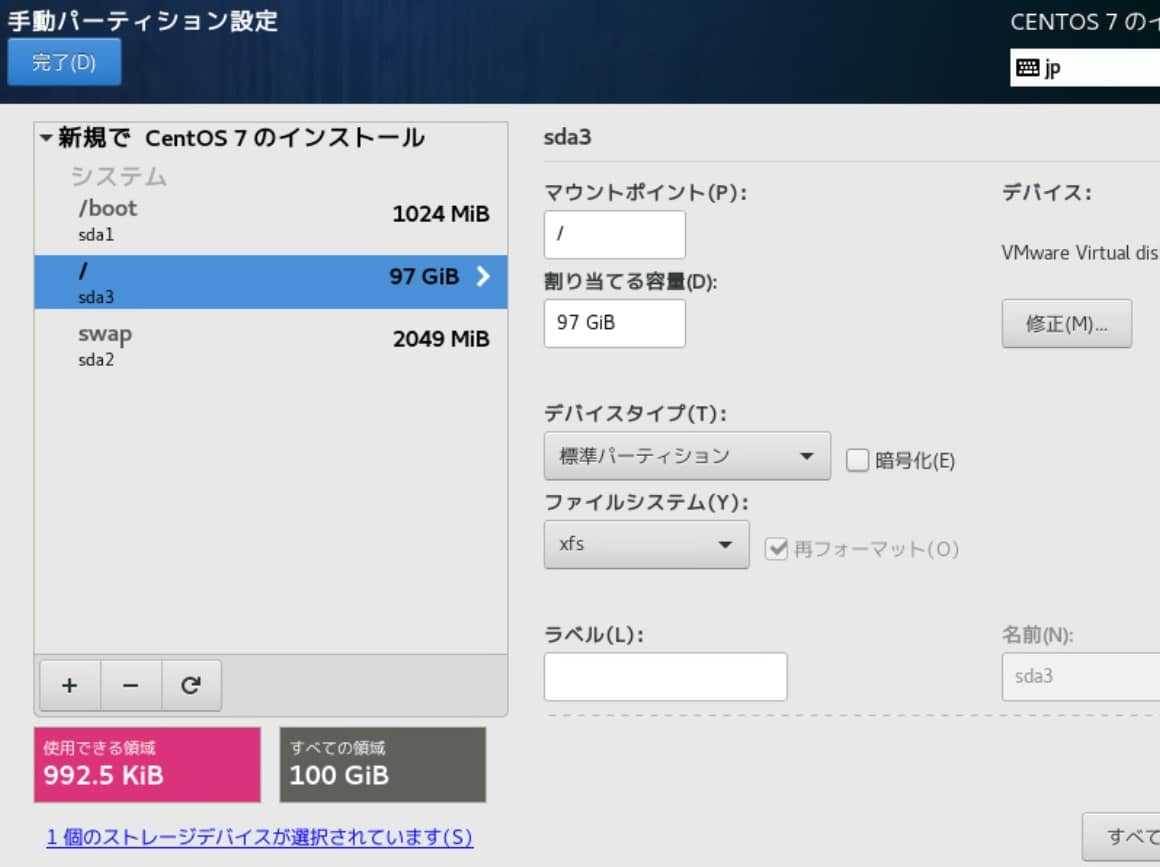
拡張前のCentOSのディスク情報はこのようになっています。
df の結果
[root@localhost ~]# df -h
ファイルシス   サイズ  使用  残り 使用% マウント位置
devtmpfs         909M     0  909M    0% /dev
tmpfs            920M     0  920M    0% /dev/shm
tmpfs            920M  8.8M  911M    1% /run
tmpfs            920M     0  920M    0% /sys/fs/cgroup
/dev/sda3         97G  1.4G   96G    2% /
/dev/sda1       1014M  176M  839M   18% /boot
tmpfs            184M     0  184M    0% /run/user/0
fdisk の結果
[root@localhost ~]# fdisk /dev/sda
Welcome to fdisk (util-linux 2.23.2).

Changes will remain in memory only, until you decide to write them.
Be careful before using the write command.


コマンド (m でヘルプ): p

Disk /dev/sda: 107.4 GB, 107374182400 bytes, 209715200 sectors
Units = sectors of 1 * 512 = 512 bytes
Sector size (logical/physical): 512 bytes / 512 bytes
I/O サイズ (最小 / 推奨): 512 バイト / 512 バイト
Disk label type: dos
ディスク識別子: 0x000a8dfe

デバイス ブート      始点        終点     ブロック   Id  システム
/dev/sda1   *        2048     2099199     1048576   83  Linux
/dev/sda2         2099200     6295551     2098176   82  Linux swap / Solaris
/dev/sda3         6295552   209715199   101709824   83  Linux
ディスク拡張作業 (VMware側)
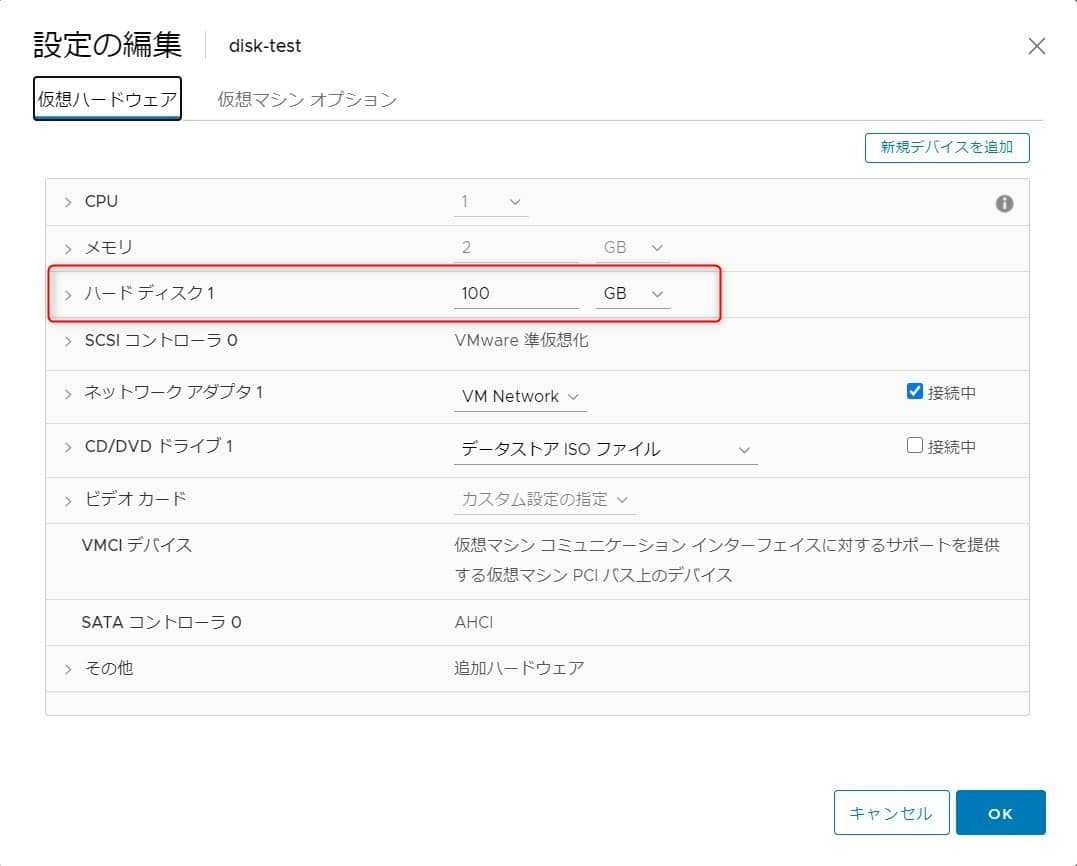
操作は、VMware ESXi から行います。
作成した 仮想マシンの設定から、ディスクサイズを変更 します。 評価では OS を停止せず 行いました。
- 変更前
- 変更後
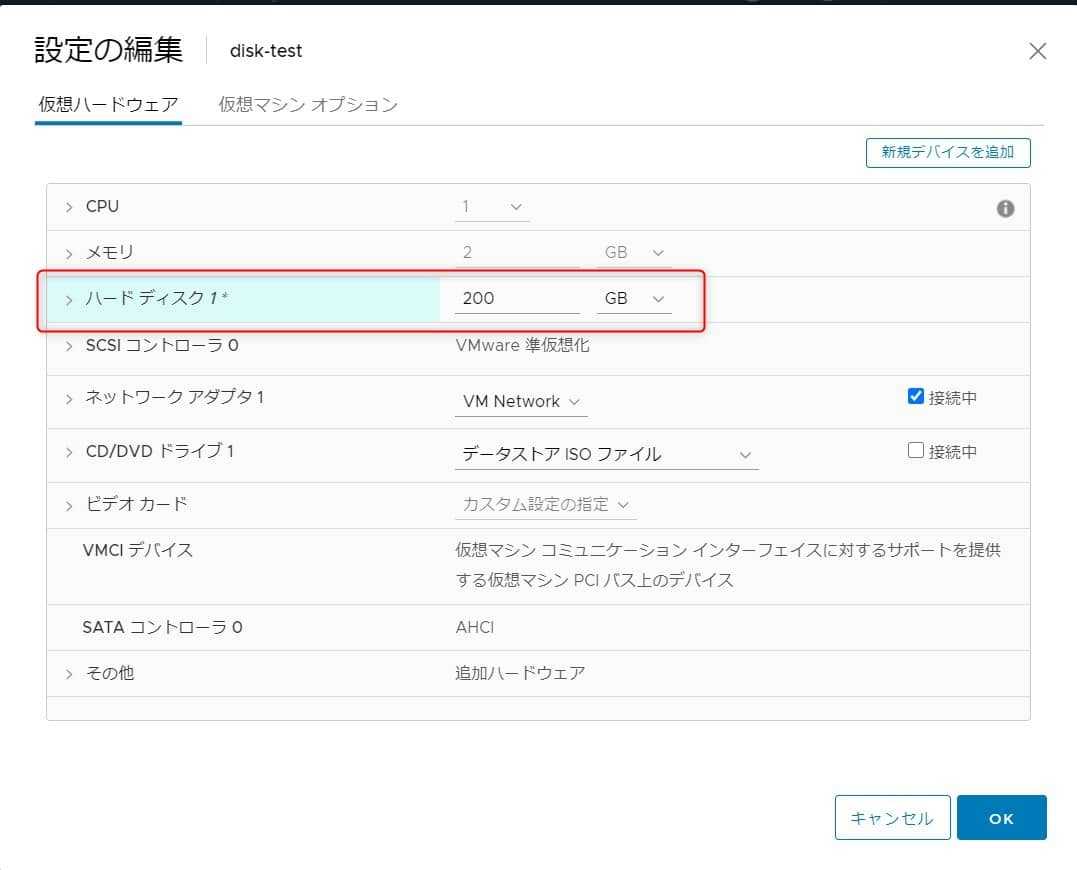
変更後は サイズを増やすと減らすことができなくなるので注意 です。

変更後に OSを再起動 します。 再起動後、再度ディスクの状態を確認 してみます。
df の結果は変わっていませんが fdisk で認識している容量が増えている ことが確認できます。
df の結果
[root@localhost ~]# df -h
ファイルシス   サイズ  使用  残り 使用% マウント位置
devtmpfs         909M     0  909M    0% /dev
tmpfs            920M     0  920M    0% /dev/shm
tmpfs            920M  8.8M  911M    1% /run
tmpfs            920M     0  920M    0% /sys/fs/cgroup
/dev/sda3         97G  1.4G   96G    2% /
/dev/sda1       1014M  176M  839M   18% /boot
tmpfs            184M     0  184M    0% /run/user/0
fdisk の結果
[root@localhost ~]# fdisk /dev/sda
Welcome to fdisk (util-linux 2.23.2).

Changes will remain in memory only, until you decide to write them.
Be careful before using the write command.


コマンド (m でヘルプ): p

Disk /dev/sda: 214.7 GB, 214748364800 bytes, 419430400 sectors
Units = sectors of 1 * 512 = 512 bytes
Sector size (logical/physical): 512 bytes / 512 bytes
I/O サイズ (最小 / 推奨): 512 バイト / 512 バイト
Disk label type: dos
ディスク識別子: 0x000a8dfe

デバイス ブート      始点        終点     ブロック   Id  システム
/dev/sda1   *        2048     2099199     1048576   83  Linux
/dev/sda2         2099200     6295551     2098176   82  Linux swap / Solaris
/dev/sda3         6295552   209715199   101709824   83  Linux
fdisk の結果抜粋 ( 拡張前 )
Disk /dev/sda: 107.4 GB, 107374182400 bytes, 209715200 sectors
fdisk の結果抜粋 ( 拡張後 )
Disk /dev/sda: 214.7 GB, 214748364800 bytes, 419430400 sectors
認識している 容量が、107374182400 bytes → 214748364800 bytes に増えている のが分かります。
ディスク拡張作業 (OS側)
とても デリケートな作業 です。 操作を誤れば再起不能になりますのでご注意 ください。
作業の概要は、 容量を拡張するため、/dev/sda3 の 終点 ( End ) を後ろに拡張 します。 一度 /dev/sda3 を削除 ( d )し、終点 ( End ) を変更した /dev/sda3 を作成 ( n ) します。
それではいきましょう。 ★= 入力ポイント+コメント です。
fdisk /dev/sda を実行
[root@localhost ~]# fdisk /dev/sda
Welcome to fdisk (util-linux 2.23.2).

Changes will remain in memory only, until you decide to write them.
Be careful before using the write command.


コマンド (m でヘルプ): d ★ d ( 削除 ) を入力する
パーティション番号 (1-3, default 3): 3 ★ 3 ( /dev/sda3 ) を削除する
Partition 3 is deleted

コマンド (m でヘルプ): p ★ p を入力し状況を確認, /dev/sda3 が消えていることが確認できる

Disk /dev/sda: 214.7 GB, 214748364800 bytes, 419430400 sectors
Units = sectors of 1 * 512 = 512 bytes
Sector size (logical/physical): 512 bytes / 512 bytes
I/O サイズ (最小 / 推奨): 512 バイト / 512 バイト
Disk label type: dos
ディスク識別子: 0x000a8dfe

デバイス ブート      始点        終点     ブロック   Id  システム
/dev/sda1   *        2048     2099199     1048576   83  Linux
/dev/sda2         2099200     6295551     2098176   82  Linux swap / Solaris

コマンド (m でヘルプ): n ★ n で /dev/sda3 の再作成に進む
Partition type:
   p   primary (2 primary, 0 extended, 2 free)
   e   extended
Select (default p): p ★ p で primry を指定する
パーティション番号 (3,4, default 3): 3 ★ 3 を入力し /dev/sda3 を作成する
最初 sector (6295552-419430399, 初期値 6295552): ★ Enter を押す ( 初期値の自動判別 )
初期値 6295552 を使います
Last sector, +sectors or +size{K,M,G} (6295552-419430399, 初期値 419430399): ★ Enter を押す ( 初期値の自動判別 )
初期値 419430399 を使います
Partition 3 of type Linux and of size 197 GiB is set

コマンド (m でヘルプ): p ★ p を入力する ( p で状況を確認, /dev/sda3 が最大値で再作成できていることが確認できる )

Disk /dev/sda: 214.7 GB, 214748364800 bytes, 419430400 sectors
Units = sectors of 1 * 512 = 512 bytes
Sector size (logical/physical): 512 bytes / 512 bytes
I/O サイズ (最小 / 推奨): 512 バイト / 512 バイト
Disk label type: dos
ディスク識別子: 0x000a8dfe

デバイス ブート      始点        終点     ブロック   Id  システム
/dev/sda1   *        2048     2099199     1048576   83  Linux
/dev/sda2         2099200     6295551     2098176   82  Linux swap / Solaris
/dev/sda3         6295552   419430399   206567424   83  Linux

コマンド (m でヘルプ): w ★ w を入力し、変更を確定する (この時点で書き込まれます。誤った場合は q で fdisk を抜ける )
パーティションテーブルは変更されました!

ioctl() を呼び出してパーティションテーブルを再読込みします。

WARNING: Re-reading the partition table failed with error 16: デバイスもしくはリソースがビジー状態です.
The kernel still uses the old table. The new table will be used at
the next reboot or after you run partprobe(8) or kpartx(8)
ディスクを同期しています。
OS を再起動 します。 SSHでつながりました。ひと安心。
df してみます。
df の結果
[root@localhost ~]# df -h
ファイルシス   サイズ  使用  残り 使用% マウント位置
devtmpfs         909M     0  909M    0% /dev
tmpfs            920M     0  920M    0% /dev/shm
tmpfs            920M  8.8M  911M    1% /run
tmpfs            920M     0  920M    0% /sys/fs/cgroup
/dev/sda3         97G  1.4G   96G    2% /
/dev/sda1       1014M  176M  839M   18% /boot
tmpfs            184M     0  184M    0% /run/user/0
まだ変わってません ね。
最後に、マウント中の XFS ファイルシステムを拡大するため のコマンド xfs_growfs で /dev/sda3 の容量を変更します。
3.4. XFS ファイルシステムのサイズの拡大 Red Hat Enterprise Linux 7 | Red Hat Customer Portal
xfs_growfs /dev/sda3 を実行
[root@localhost ~]# xfs_growfs /dev/sda3
meta-data=/dev/sda3              isize=512    agcount=4, agsize=6356864 blks
         =                       sectsz=512   attr=2, projid32bit=1
         =                       crc=1        finobt=0 spinodes=0
data     =                       bsize=4096   blocks=25427456, imaxpct=25
         =                       sunit=0      swidth=0 blks
naming   =version 2              bsize=4096   ascii-ci=0 ftype=1
log      =internal               bsize=4096   blocks=12415, version=2
         =                       sectsz=512   sunit=0 blks, lazy-count=1
realtime =none                   extsz=4096   blocks=0, rtextents=0
data blocks changed from 25427456 to 51641856
再度 df します。 おー、無事拡張 されました。
df の結果
[root@localhost ~]# df -h
ファイルシス   サイズ  使用  残り 使用% マウント位置
devtmpfs         909M     0  909M    0% /dev
tmpfs            920M     0  920M    0% /dev/shm
tmpfs            920M  8.8M  911M    1% /run
tmpfs            920M     0  920M    0% /sys/fs/cgroup
/dev/sda3        197G  1.4G  196G    1% / ★ 200GB になった
/dev/sda1       1014M  176M  839M   18% /boot
tmpfs            184M     0  184M    0% /run/user/0
あとがき
実際にお客様の環境で実施した手順ですが、構築時点からLVMにしていたらよかったと後悔しました。。
それでは次回の記事でお会いしましょう。

